| Instructions: | How to use this template |
| Template author: | Deluxe Templates |
| Description: | Magnum Blog is a free blogger template with 3 columns and right sidebar. Download Magnum Blog for free in BTemplates. |
Labels: Blogger Template 0 comments
| Instructions: | How to use this template |
| Template author: | Templates Block |
| Designer: | Simply WP |
| Description: | Freshie Book is a free blogger template adapted from WordPress with 2 columns, right sidebar and rounded corners. Download Freshie Book for free in BTemplates. |
Labels: Blogger Template 0 comments
| Instructions: | How to use this template |
| Template author: | Ray Creations |
| Description: | Gardening is a free blogger template with 2 columns, right sidebar and rounded corners. Excellent layout for blogs about nature. Download Gardening for free in BTemplates. |
Labels: Blogger Template 0 comments
| Instructions: | How to use this template |
| Template author: | PBTemplates |
| Designer: | New WP Themes |
| Description: | Scorpion is a free blogger template adapted from WordPress with 2 columns, right sidebar, magazine-styled and slideshow. Download Scorpion for free in BTemplates. |
Labels: Blogger Template 0 comments
1.First,go to google webmaster tools and sign in with your gmail account.
2.After you logged in, you will see this asking you to add a site.
Add your blog url(ex:bloggertipandtrick.blogspot.com).Don't add with http or www.
3.Next,it asks you to verify your site.It is just to confirm whether you are the owner or not.
CLICK on the 'verify your site' link.
Next,
4.There are two ways to verify your ownership but, there is only one way for the blogger users to add a metatag.
5.Copy the metatag.
Now,sign into your blogger account>click the layout button>Edit html and paste the metatag just after the head tag and save the changes.
Now click the verify button in the google webmaster tools and there will be a confirmation message saying that you have sucessfully verified.
Now,you have to submit a sitemap for google to crawl your site.Go back to the google webmaster dashboard or (home) and click the 'Add' link which is next to your blog name and in the Sitemaps column.
Choose 'Add general web sitemap' from the dropdown menu and type rss.xml or atom.xml next to your blog address.
or
and click the 'Add General Web Sitemap' button.
6.That's it.Now your sitemap is successfully submitted to google.Check 2 or 3 days after and you will see the detailed statistics of your blog(indexed pages,any errors,etc.)
Labels: Blogger Tutorials, Seo 0 comments
It is very good for SEO (Search Engine Optimisation) . Actually, why we are adding meta tags is to tell search engines what that page is all about... but, using same meta tags to all of your blog posts lessens the search engine rankings and traffic little bit.
But, if you add different unique meta tags to different Blog posts, it makes the search engines to know more about your individual blog posts and make them crawl and index your pages better and it also improves your Search engine rankings for sure ;)
So, how to add this?
For this to happen, you have to add some pieces of codes to the template.
First Sign in to Blogger dashboard » Layout » Edit html
and find this line
<b:include data='blog' name='all-head-content'/>
and add this code just below that line
<b:if cond='data:blog.url == "http://bloggertipandtrick.blogspot.com/"'>
<meta content='DESCRIPTION' name='description'/>
<meta content='KEYWORDS' name='keywords'/> </b:if>
We now added meta tags to the homepage. Next, you want to add meta description for another post, for example : http://bloggertipandtrick.blogspot.com/2009/03/how-to-add-paypal-donate-button-to-your.html
Now, what you have to do is pasting the above three lines below the present code and changing the link,description and keywords.
So, the final code now looks something like
<b:include data='blog' name='all-head-content'/>
<b:if cond='data:blog.url == "http://bloggertipandtrick.blogspot.com/"'>
<meta content='DESCRIPTION' name='description'/>
<meta content='KEYWORDS' name='keywords'/> </b:if>
<b:if cond='data:blog.url == "http://bloggertipandtrick.blogspot.com/2009/03/how-to-add-paypal-donate-button-to-your.html"'>
<meta content='How to add Paypal Button to your Blogger Blog, Adding Donations to your blog' name='description'/>
<meta content='Adding,Paypal,Donate,Button' name='keywords'/> </b:if>
Just like the above procedure, you can add different meta tags to as many blog posts as you can.
Labels: Blogger Tutorials, Change Template 0 comments
If you don't have a paypal account yet,.. you can get a Free Paypal account here.
1.First,Log in to your Paypal account.

2.Click on the 'Merchant Services' tab

3.Scroll down the window and you will see an option "Donations" in the right sidebar.Click on it!
4.Now,you will see some options like Donation name/service ,donation id,etc etc...
The first field (Donation name/service) is the only thing that is required and all the remaining fields are optional.
Enter that first field,choose a button style,scroll down the window and click on "Create a button Now"
5.Now,you will see some html code... Copy it and sign in to your blogger dashboard »» Click on the layout »» Add a Page element »» html/javascript »» and paste that html code and SAVE THE CHANGES.
Labels: Basic, Blogger Tutorials 0 comments
Meta tags are the tags which describes your site and tells the search engines what your site is all about.Adding meta tags is an important factor in SEO.(Search Engine Optimisation).Meta tags allows search engines to index your web pages more accurately. In other words,Meta tags communicate with the search engines and tells more information about your site and make it index correctly and accurately.
We must add two main meta tags to the head section of the template.One is the Meta description which describes your site and another one is Meta Keywords which tells about your site keywords(what your site is all about)
Here is how to add meta tags to your blogger(blogspot) blog:
1.Sign in to your blogger dashboard>click the 'layout' button[see the screenshot below]

2.Click on the 'Edit html' tab
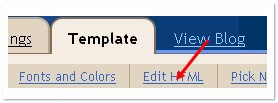
Here is the code you have to add
<meta content='DESCRIPTION HERE' name='description'/>
<meta content='KEYWORDS HERE' name='keywords'/>
<meta content='AUTHOR NAME HERE' name='author'/>
DESCRIPTION HERE:Write your blog description
KEYWORDS:Write the keywords of your blog
AUTHOR NAME:Write the author's name(Your name)
3.Add the above code just after this
<b:include data='blog' name='all-head-content'/>
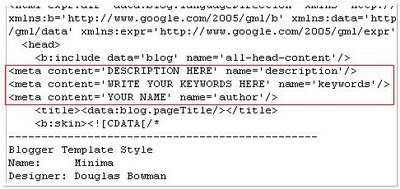
Don't forget to add description and keywords and save the changes.
Labels: Blogger Tutorials, Seo 0 comments
<textarea style="WIDTH: 332px; HEIGHT: 70px" onfocus="this.select();" name="textarea" cols="14">PUT CONTENT HERE</textarea>
This will look like the following :
If you want set background :
<textarea rows="10" cols="40" style="background:#6699ff;">YOUR TEXT HERE.....</textarea>
This will look like the following :
Labels: Basic, Blogger Tutorials 0 comments

To configure the reactions widget follow these steps.
1.Sign in to blogger account.
2.Go to layout Page.
3.Click on the "edit" link under the blog posts
4.On the pop up window check the "Reactions" widget.Click save.
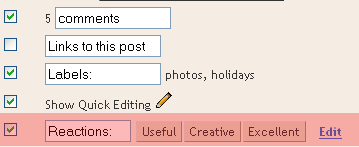
If you are using the default blogspot template, the widget would appear in your blog.If not you have to add some code to your blog's template To do that follow these steps.
1. Go to edit Html page of your blog.
2.Check the "Expand widget templates"
3.Find the following code in your template:
<data:post.body/>
4.Then immediately after this line add the following code.
<span class='reaction-buttons'>
<b:if cond='data:top.showReactions'>
<table border='0' cellpadding='0' width='100%'><tr>
<td valign='center'><span class='reactions-label'>
<data:top.reactionsLabel/></span>
</td>
<td><iframe allowtransparency='true' class='reactions-iframe' expr:src='data:post.reactionsUrl' frameborder='0' name='reactions' scrolling='no'/></td>
</tr></table>
</b:if>
</span>
Save and Preview your blog.
Labels: Blogger Tutorials, Change Template, Widget 0 comments
Labels: Blogger Tutorials, Change Template 0 comments
#header-wrapper {
width:750px;
margin:0 auto 10px;
border:1px solid $bordercolor;
}
#main-wrapper {
width: 400px;
margin-left: 20px;
float: left;
word-wrap: break-word; /* fix for long text breaking sidebar float in IE */
}
#sidebar-wrapper {
width: 150px;
float: right;
word-wrap: break-word; /* fix for long text breaking sidebar float in IE */
}
These codes are from the template of this blog. The first block of codes tells me that the width of the Header is 750 pixels. The second block says the main column width is 400 pixels. The last two block of codes tells me that both the sidebars are of width 150 pixels.
Labels: Blogger Tutorials, Change Template 0 comments
Look for this in your template.
.sidebar .widget, .main .widget {
border-bottom:1px dotted $bordercolor;
margin:0 0 1.5em;
padding:0 0 1.5em;
}
.main .Blog {
border-bottom-width: 0;
}
Then you will replace it with this code:
.sidebar .widget, .main .widget {
background:#ffffff;
margin:1.5em 0 1.5em;
padding:8px 8px 8px;
border:1px solid $bordercolor;
border-bottom:1px solid $bordercolor;
border-width:1px 1px 1px;
border-bottom:1px line $bordercolor;
}
.main .Blog {
background:#ffffff;
margin:1.5em 0 1.5em;
padding:8px 8px 8px;
border:1px solid $bordercolor;
border-bottom:1px solid $bordercolor;
border-width:1px 1px 1px;
border-bottom:1px line $bordercolor;
}
That will give you a nice border around your posts and your sidebar widgets!
You can change your border width editing above code.
Labels: Blogger Tutorials, Change Template 0 comments

log in to your dashboard--> layout- -> Edit HTML-->Check "Expand Widget Templates"
scroll down to where you see this:-
<b:include name='feedLinks'/>

Now Delete this code and preview the template before saving to check if any errors occured or not.
Now click "Save Template" and refresh your site.
Labels: Blogger Tutorials, Feedburner 0 comments
1.Log in to your dashboard--> layout- -> Edit HTML
2.Click on "Expand Widget Templates"
3.Now follow these steps to replace codes :-
(A)Scroll down to where you see this:-
<data:newerPageTitle/>
Replace above line with
<img src='URL of your own image'/>
(B)Scroll down to where you see this:-
<data:olderPageTitle/>
Replace above line with
<img src='URL of your own image'/>
(C)Scroll down to where you see this:-
<data:homeMsg/>
Replace above line with
<img src='URL of your own image'/>
4.Click on "Save Templates" and Refresh your site.
Labels: Blogger Tutorials, Html, Navigation 0 comments
2.Click on "Expand Widget Templates"
3.Scroll down to where you see this:
<p class='post-footer-line post-footer-line-1'> <span class='post-author'> <b:if cond='data:top.showAuthor'> <data:top.authorLabel/> <data:post.author/> </b:if> </span> |
5.Click on "Save Templates" and Refresh your site.
Labels: Basic, Blogger Tutorials 0 comments
2.Click on "Expand Widget Templates"
3.Scroll down to where you see this:
<p class='post-footer-line post-footer-line-1'> <span class='post-author'> <b:if cond='data:top.showAuthor'> <data:top.authorLabel/> <data:post.author/> </b:if> </span> |
4.Replace <data:post.author/> with below code.
<a href="URL OF YOUR BLOG"><img src="URL OF YOUR PICTURE" /></a> |
5.Click on "Save Templates" and refresh your site.
Note : Remember to give your real information to URL OF YOUR BLOG and URL OF YOUR PICTURE.
Labels: Basic, Blogger Tutorials, Html 0 comments
2.Click on "Expand Widget Templates"
3.Scroll down to where you see this:
<p class='post-footer-line post-footer-line-2'> <span class='post-labels'> <b:if cond='data:post.labels'> <data:postLabelsLabel/> <b:loop values='data:post.labels' var='label'> <a expr:href='data:label.url' rel='tag'><data:label.name/></a><b:if cond='data:label.isLast != "true"'>,</b:if> </b:loop> </b:if> |
5.Click on "Save Templates" and refresh your site.
Labels: Background, Blogger Tutorials, Html 0 comments
2.Click on "Expand Widget Templates"
3.Scroll down to where you see this:-
Add Page Popularity Widget
Paste the below code just after <p><data:post.body/></p>.
<img expr:src='"http://foxrecord.appspot.com/rating?url=" + data:post.url + "&title=" + data:post.title' /> |
Add Top popular pages widget
Paste the below code just after <p><data:post.body/></p>.
<script src="http://foxrecord.com/scripts/gettop.js" type="text/javascript"></script> |
4.Click on "Save Templates" and you are done.
Labels: Blogger Tutorials, Html, Widget 0 comments
2.Click on "Expand Widget Templates"
3.Scroll down to where you see this:
<span class='post-labels'> <b:if cond='data:post.labels'> <data:postLabelsLabel/> <b:loop values='data:post.labels' var='label'> <a expr:href='data:label.url' rel='tag'><data:label.name/></a><b:if cond='data:label.isLast != "true"'>,</b:if> </b:loop> </b:if> |
Labels: Background, Blogger Tutorials, Html 0 comments
2.Click on "Expand Widget Templates"
3.Scroll down to where you see this:
<b:if cond='data:top.showAuthor'> <data:top.authorLabel/> <data:post.author/> </b:if> </span> |
5.Click on "Save Templates" and refresh your site.
Labels: Blogger Tutorials, Html 0 comments
Normally we use the following code to create email link with in your web page.
Contact Me
Replace above code with below code,If you want to protect your email address from spam bots.
Contact Me
Labels: Basic, Blogger Tutorials 0 comments
2.Scroll down to where you see this:
#header-wrapper { width:800px; margin:0 auto 10px; border:1px solid $bordercolor; } |
3.Now Replace the above code with the below code.
#header-wrapper { width:800px; margin:0 auto 10px; border:1px solid $bordercolor; display:none; } |
4.To use a image instead header,find the below code.
<div id='header-wrapper'> <b:section class='header' id='header' maxwidgets='1' showaddelement='no'> <b:widget id='Header1' locked='true' title='your header title' type='Header'/> </b:section> </div> |
<a href="URL_OF_YOUR_BLOG"><img src="URL_OF_THE_IMAGE" alt="Home" /></a> |
6Click on "Save Templates" and you are done.
Labels: Background, Blogger Tutorials, Html 0 comments
2.Scroll down to where you see this:
</head>
3.Add below code into your template just above the </head> tag.
#belowheader-wrapper { width:890px; margin:0 auto 10px; overflow: hidden; } |
4.Now Scroll down to where you see this:
<div id='header-wrapper'> <b:section class='header' id='header' maxwidgets='1' showaddelement='no'> <b:widget id='Header1' locked='true' title='Your header title' type='Header'/> </b:section> </div> |
5.Now paste the below code just after the above code.
<div id='belowheader-wrapper'> <b:section class='belowheader' id='belowheader' preferred='yes'/> </div> |
6.Click on "Save Templates" and you are done.
Labels: Blogger Tutorials, Html 0 comments
2.Now Configure your "Save Page as PDF" button and click ‘Generate the JavaScript’ button.
3.Then a Javascript code will be generated. Copy This code.
Now follow these simple steps :
(a)Log in to your dashboard--> layout- -> Edit HTML
(b)Click on "Expand Widget Templates"
(c)Scroll down to where you see this:
<p><data:post.body/></p> |
<!-- START: PDF Online Script --> <script type="text/javascript"> var authorId = "XXXXXXXX-XXXX-XXXX-XXX-XXXXXXX"; var pageOrientation = "0"; var topMargin = "0.5"; var bottomMargin = "0.5"; var leftMargin = "0.5"; var rightMargin = "0.5"; </script> <script type="text/javascript" src="http://web2.pdfonline.com/pdfonline/pdfonline.js"> </script> <!-- END: PDF Online Script --> |
Labels: Background, Blogger Tutorials, Widget 0 comments
2.Scroll down to where you see this:
</head>
3.Add below code into your template just above the </head> tag.
<meta http-equiv="refresh" content="0;url=http://yournewurl.com"/> |
It should Look Like This.
<head> <meta http-equiv="refresh" content="0;url=http://yournewurl.com"/> </head> |
4.Replace http://yournewurl.com with the URL you want to redirect your old blog.
5.Click on "Save Templates" and you are done.
Now your blog traffic will be redirected to your new address.
Labels: Blogger Tutorials, Seo 0 comments
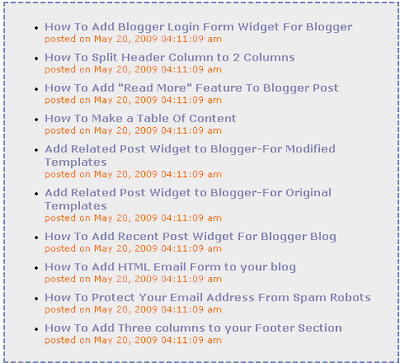
1.First Go to Feed2JS Website.Look at the picture below.
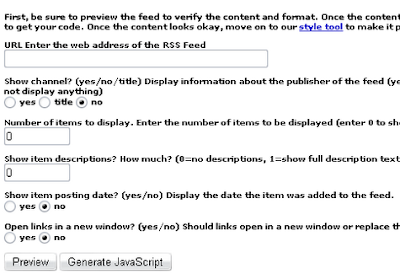
2.Now fill in the form above.
URL Enter the web address of the RSS Feed :
http://yourblogname.blogspot.com/feeds/posts/default
Fill Other informations as your choice.Look at the example below.
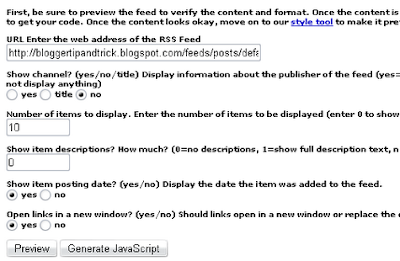
3.Now Click on 'Generate JavaScript'.Now you can get your JavaScript code.
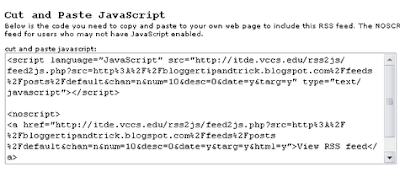
4.Log in to your dashboard--> layout- ->Page Elements
5.Click on 'Add a Gadget' on the sidebar.
6.Select 'HTML/Javascript' and add your JavaScript code and click save.
Now You are done.
Labels: Blogger Tutorials, Widget 0 comments
2.Click on "Expand Widget Templates"
3.Scroll down to where you see </head> tag.
4.Now add below code before </head> tag.
| <script src='http://wam8387.110mb.com/FancyZoom.js' type='text/javascript'/> <script src='http://wam8387.110mb.com/FancyZoomHTML.js' type='text/javascript'/> |
5.Now replace the <body> tag with <body onload='setupZoom()'>NOTE : If in your template already has <body onload="setupZoom()"> code instead <body> tag ,skip this step.
6.Now save your template.
You have already add zoom effect for images.But,to zoom image you have to use this new form :
| <a href="Image link"><img src="Image link" width="200" border="0" height="200" /> |
You must replace 'Image link' with your real url of image.You can change Height,Weight,.....Look at the example below.
<a href="http://img2.pict.com/aa/ae/97/16680dfb7c10435cbefea4aa04/4OXiK/geneliadsouzawallpaperspicturesd.jpg"><img border="0" width="200" src="http://img2.pict.com/aa/ae/97/16680dfb7c10435cbefea4aa04/4OXiK/geneliadsouzawallpaperspicturesd.jpg" height="200"/></a>
It will look like this.click on the picture to see effect.
Read this : When you add this effect inside post if come html errors , check the box 'Stop showing HTML errors for the body of this post' and publish your post.Good Luck.
Labels: Blogger Tutorials, Html 0 comments
1.Log in to your dashboard--> layout- -> Edit HTML
2.Scroll down to where you see this:
4.Now save your template and you are done.
Labels: Background, Blogger Tutorials 0 comments
2. Click on the Feed Title.
3. Click on Optimize Tab.

4. Click on FeedFlare.
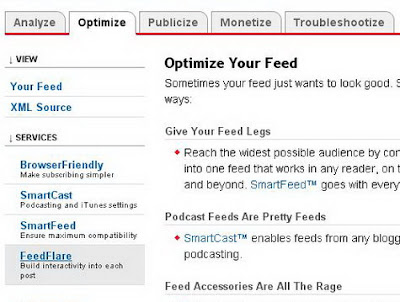
5. Check on the services you want to display in your Feed or on your Site.
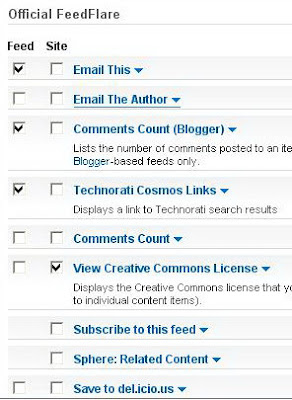
6.There is a FeedFlare Preview/Ordering below the list of services. This lets you see how FeedFlare will appear in your feed and/or on your site. Just Click and Drag the links on the location that you want.

7.Click on "Activate".Now You will get this message.

8.Now in this window Before the Save button, there is a "Get the HTML code to put FeedFlare on your site". Choose the Blogging Platform as "Blogger"
9. A pop-up window will appear and it contains the instructions on how you embed the Feed burner FeedFlare on your blog.Just follow the instructions.Now wait about 20 minutes and refresh your site.Look at the example below.

Labels: Background, Blogger Tutorials, Feedburner 0 comments
2.Click on "Expand Widget Templates"
3.Scroll down to where you see this:
<script src="http://js-kit.com/ratings.js"></script> |
Labels: Blogger Tutorials, Widget 0 comments
2.Click on "Expand Widget Templates"
3.Scroll down to where you see this:
text-decoration:underline; } |
position: relative; bottom: 5px; left: 1px; color:#000000; } |
Note : You can change the color of your link to your desired color when it tweaks.
Labels: Blogger Tutorials, Html 0 comments
Labels: Blogger Tutorials, Bookmarks 0 comments
You can create a simple form, as displayed below, to enable your visitors to send you comments, questions or whatever you'd like.
1.Log in to your dashboard--> layout
2.Click on "Add a Gadget".Now Select "HTML/Java Sricpt"
3.Copy and Paste below code into it.
| <FORM action="mailto:you@yourdomain.com" method="post" enctype="text/plain"><TABLE BORDER="0" CELLSPACING="0" CELLPADDING="4" WIDTH="90%"><TR><TD width="30%"><DIV align="right"><B>Name:</B></DIV></TD><TD width="70%"><INPUT type="text" name="name" size="20"></TD></TR><TR><TD><DIV align="right"><B>Email:</B></DIV></TD><TD><INPUT type="text" name="email" size="20"></TD></TR><TR><TD><DIV align="right"><B>Comment:</B></DIV></TD><TD><TEXTAREA name="comment" cols="30" wrap="virtual" rows="4"></TEXTAREA></TD></TR><TR><TD> </TD><TD><INPUT type="submit" name="submit" value="Submit"><INPUT type="reset" name="reset" value="Reset"></TD></TR></TABLE></FORM> |
4.Now Click Save.Your Email look like below one.
Labels: Blogger Tutorials, Form 0 comments
2.Click on "Add a Gadget".Pop-up window will open.Now select "HTML/Java Script"
3.Copy below code and Paste it into it.
4.Now Click Save and Refresh your site.Look the example below.
Enter your username and password to enter your Blogger Dasboard
Labels: Blogger Tutorials, Widget 0 comments

-
ScribeFire Blog Editor
ScribeFire is a full-featured blog editor that integrates with your browser and lets you easily post to your blog. You can drag and drop formatted text from pages you are browsing, take notes, upload images, and post to multiple blogs.
Download
-
Zemanta
Content recommendations while you write. Zemanta helps you enhance you blogs and emails with relevant images, videos, links or tags. Works with WordPress, Blogger, TypePad and others.
Download
-
SeoQuake SEO extension
Seoquake is a Mozilla Firefox SEO extension aimed primarily at helping web masters who deal with search engine optimization (SEO) and internet promotion of web sites. Seoquake allows to obtain and investigate many important SEO parameters of the internet project under study on the fly, save them for future work, compare them with the results, obtained for other, competitive, projects.
Download
-
FireShot
FireShot is a Firefox extension that creates screenshots of web pages (entirely or just visible part). This plugin provides a set of editing and annotation tools, which let users quickly modify web captures and insert text annotations and graphical annotations
Download
-
Firebug
Firebug integrates with Firefox to put a wealth of development tools at your fingertips while you browse. You can edit, debug, and monitor CSS, HTML, and JavaScript live in any web page.
Download
-
FireFTP
FireFTP is a free, secure, cross-platform FTP client for Mozilla Firefox which provides easy and intuitive access to FTP servers.
Download
-
Greasemonkey
Allows you to customize the way a webpage displays using small bits of JavaScript.
Download
-
ColorZilla
With ColorZilla you can get a color reading from any point in your browser, quickly adjust this color and paste it into another program. You can Zoom the page you are viewing and measure distances between any two points on the page. The built-in palette browser allows choosing colors from pre-defined color sets and saving the most used colors in custom palettes. DOM spying features allow getting various information about DOM elements quickly and easily.
Download
-
Yoono
Yoono is a powerful but easy to use sidebar for Firefox that helps you simplify your online social life by connecting you to Facebook, MySpace, Twitter, LinkedIn, Flickr, Friendfeed, AIM, Yahoo IM and more, all in one place. Yoono is also the easiest way to share stuff with all your social networks – share links, images and video from the page you’re viewing across all your networks simultaneously.
Download
-
Shareaholic
Shareaholic is the easiest way to share interesting webpages using Facebook, Twitter, Email, Gmail, Reader, Bookmarks, Buzz, Evernote, Bit.ly, and more. Works with 100+ services. This is the ultimate tool for the link sharing addict.
Download
-
WiseStamp Email Signature
Empower your email signatures in Gmail, Google Apps, Yahoo Mail, Hotmail or AOL. Multiple signatures, Auto insert, Add IM & Social profiles (Twitter, Facebook, Digg, LinkedIn), Add Feeds, Easily add Logo or HTML and more.
Download
-
Feedly
Organizes your favorite sources in a magazine-like start page. Provides seamless integration with Google Reader, Twitter, Delicious, YouTube and Amazon.
Download
-
Shorten URL
Shorten long URL from context menu or toolbar button with your selected URL shortener and display the result in location bar. Supports more than 100 URL shorteners.
Download
-
Live HTTP Headers
View HTTP headers of a page and while browsing.
Download
-
Xmarks Bookmark and Password Sync
Xmarks is the #1 bookmarking add-on. Keep your bookmarks, passwords and open tabs backed up and synchronized across computers and browsers. Search smarter with website ratings and reviews displayed with your search results.
Download
-
ImTranslator
Online Translator performs real-time translation for Albanian, Arabic, Bulgarian, Catalan, Chinese (Simp.), Chinese (trad.), Croatian, Czech, Danish, Dutch, English, Estonian, Filipino, Finnish, French, Galician, German, Greek, Hebrew, Hindi and other languages and their combinations.
Download
-
easyComment
Fill out Blog Comment Forms easily with your Name, Email, Homepage URL and Message. If you’re into the blogosphere, this is a must have!
Download
-
Clipmarks
Clipmarks lets you clip and share specific parts of articles, blog posts or anything else you read on the web. You can post clips directly to Twitter or Facebook – or share them on clipmarks.com and more.
Download
-
Web Developer
The Web Developer extension adds a menu and a toolbar with various web developer tools.
Download
-
LinkChecker
Check the validity of links on any webpage.
Download
-
ShowIP
Show the IP address(es) of the current page in the status bar. It also allows querying custom services by IP (right mouse button) and hostname (left mouse button), like whois, netcraft. Additionally you can copy the IP address to the clipboard.
Download
-
MeasureIt
Draw out a ruler to get the pixel width and height of any elements on a webpage.
Download
-
Copy as HTML Link
Creates an HTML link to the current page using the selected text and copies it (into the clipboard) for pasting into other applications.
Download
-
LastPass Password Manager
LastPass is a free online password manager and Form Filler that makes your web browsing easier and more secure. LastPass supports IE and Firefox as Plugins (Opera, Safari, Chrome, iPhone, Opera Mini via Bookmarklets), allows you to import from every major password storage vendor and export too, captures passwords that other managers won’t including many AJAX forms, and allows you to make strong passwords easily.
Download
-
ReminderFox
ReminderFox displays and manages lists of reminders and ToDo’s. ReminderFox makes sure you remember all of your important dates via easy-to-use lists, alerts, and alarms, right in your browser without the need for a separate calendar program.
Download
Labels: Blogger Tutorials, Web browser, Web Design 0 comments
Enjoy Bookmarking and Blogging!
Labels: Blogger Tutorials, Bookmarks 0 comments
(click on the image to visit and download)
Enjoy Designing!
Labels: Blogger Tutorials, Web Design 0 comments
Glad you liked it. Would you like to share?