Your Ad Here
1.Log in to your dashboard--> layout- -> Edit HTML
2.Click on "Expand Widget Templates"
3.Scroll down to where you see this:

<p class='post-footer-line post-footer-line-2'>
<span class='post-labels'>
<b:if cond='data:post.labels'>
<data:postLabelsLabel/>
<b:loop values='data:post.labels' var='label'>
<a expr:href='data:label.url' rel='tag'><data:label.name/></a><b:if cond='data:label.isLast != "true"'>,</b:if>
</b:loop>
</b:if>
4.Replace the line <data:postLabelsLabel/>  of above code with your own name,like" CATEGORIES".
5.Click on "Save Templates" and refresh your site.
Read More...
1.Log in to your dashboard--> layout- -> Edit HTML
2.Click on "Expand Widget Templates"
3.Scroll down to where you see this:
<p class='post-footer-line post-footer-line-2'>
<span class='post-labels'>
<b:if cond='data:post.labels'>
<data:postLabelsLabel/>
<b:loop values='data:post.labels' var='label'>
<a expr:href='data:label.url' rel='tag'><data:label.name/></a><b:if cond='data:label.isLast != "true"'>,</b:if>
</b:loop>
</b:if>
4.Replace the line  <data:postLabelsLabel/>  with below code.
<img src="URL OF YOUR IMAGE " alt="BLOG TITLE" />
Read More...
1.Log in to your dashboard--> layout- -> Edit HTML

2.Scroll down to where you see this:

#header-wrapper {
width:800px;
margin:0 auto 10px;
border:1px solid $bordercolor;
}
Note :- width:660px can be different value.
3.Now Replace the above code with the below code.

#header-wrapper {
width:800px;
margin:0 auto 10px;
border:1px solid $bordercolor;
display:none;
}
Done. above code hides your blog header.
4.To use a image instead header,find the below code.

<div id='header-wrapper'>
<b:section class='header' id='header' maxwidgets='1' showaddelement='no'>
<b:widget id='Header1' locked='true' title='your header title' type='Header'/>
</b:section>
</div>
5.Now paste the below code just after the above code.

<a href="URL_OF_YOUR_BLOG"><img src="URL_OF_THE_IMAGE" alt="Home" /></a>


6Click on "Save Templates" and you are done.
Read More...
1.First Sign up with Web2PDF.
2.Now Configure your "Save Page as PDF" button and click ‘Generate the JavaScript’ button.
3.Then a Javascript code will be generated. Copy This code.

Now follow these simple steps :
(a)Log in to your dashboard--> layout- -> Edit HTML
(b)Click on "Expand Widget Templates"

(c)Scroll down to where you see this:


<p><data:post.body/></p>
(d)Immediately after above line, paste the code which you have generated at the Web2Pdf Online website. It's look like below code.

<!-- START: PDF Online Script -->
<script type="text/javascript">
 var authorId = "XXXXXXXX-XXXX-XXXX-XXX-XXXXXXX";
 var pageOrientation = "0";
 var topMargin = "0.5";
 var bottomMargin = "0.5";
 var leftMargin = "0.5";
 var rightMargin = "0.5";
</script>
<script type="text/javascript" src="http://web2.pdfonline.com/pdfonline/pdfonline.js">
</script>
<!-- END: PDF Online Script -->
(e)Click on "Save Templates" and Refresh your site.
Read More...
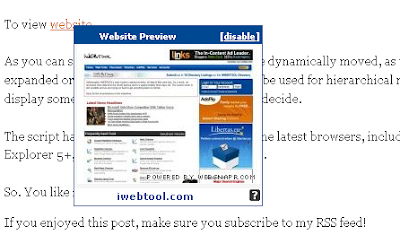
This allows web users to preview a website before visiting it. When hover your mouse over the link you can see a preview of website without visiting it.

1.Log in to your dashboard--> layout- -> Edit HTML

2.Scroll down to where you see this:
</body>
3.Now copy below code and paste it before above code.
<script language="javascript" src="http://thumbnails.iwebtool.com/src.js?border=004891" type="text/javascript"></script>
Note : red code is a HEX color code.You can change it if you like.
4.Now save your template and you are done.
Read More...
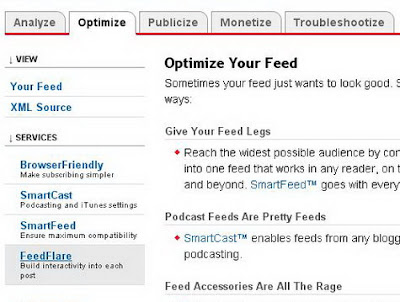
1. Login to your Feedburner account.
2. Click on the Feed Title.
3. Click on Optimize Tab.

4. Click on FeedFlare.

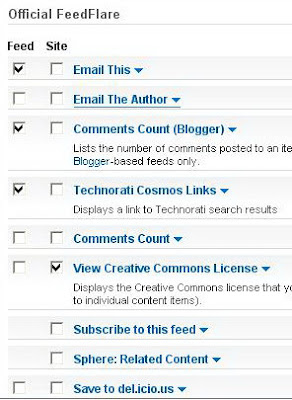
5. Check on the services you want to display in your Feed or on your Site.

6.There is a FeedFlare Preview/Ordering below the list of services. This lets you see how FeedFlare will appear in your feed and/or on your site. Just Click and Drag the links on the location that you want.

7.Click on "Activate".Now You will get this message.

8.Now in this window Before the Save button, there is a "Get the HTML code to put FeedFlare on your site". Choose the Blogging Platform as "Blogger"
9. A pop-up window will appear and it contains the instructions on how you embed the Feed burner FeedFlare on your blog.Just follow the instructions.Now wait about 20 minutes and refresh your site.Look at the example below.
Read More...

What is favicon? While using IE Firefox or Opera you will see an icon on the tab when u visit a page.This is called favicon.By default blogspot blogs have a favicon which looks ugly.See it here at the top of the post.So how to remove it? Goto Blogger Template>Edit Html There find the title tag which looks like


and immediately after that add the following code after proper editing

<link href='URL of your icon file' rel='shortcut icon' type='image/vnd.microsoft.icon'/>

Remember to replace URL of your icon file file with your icon file's url

Read More...

I don't like the blogger bar across the top of my Web site because it didn’t really go with my template and I already had a Google search bar integrated. So I went on a mission to remove it and de-bloggerify my blog. I searched far and wide and for some reason kept hitting a dead end. It turns out that the code used to change the old blogger templates no longer works! So after tracking down the CSS changes here is how I did it:

Goto Blogger Template>Edit Html .

Put the following code as the picture below.

#navbar-iframe { height:0px; visibility:hidden; display:none; }

Read More...
How To Change Blogger Header background color
log in to your dashboard--> layout- -> Edit HTML, scroll to where you see this:-

#header-wrapper {


Add immediately after that the following line:-

background:your clour;

If You want background colour set to #D3FFCC , above code must change like this.
background:#D3FFCC;

See the example below.

#header-wrapper {
background:#D3FFCC;

Save the template and refresh your site.


How To Change Blogger Main background color

log in to your dashboard--> layout- -> Edit HTML, scroll to where you see this:-

body {
background:$bgcolor;

If you want to set bgcolor to #d3ffcc , replace above code with this.

body {
background-color:#d3ffcc;
Save the template and refresh your site.

How To Change Blogger Post background color

log in to your dashboard--> layout- -> Edit HTML, scroll to where you see this:-

#main-wrapper {

If you want to set post color to #d3ffcc , replace above code with this.

#main-wrapper {
background-color:#d3ffcc;

Save the template and refresh your site.

How To Change Blogger Sidebar background color

log in to your dashboard--> layout- -> Edit HTML, scroll to where you see this:-

#sidebar-wrapper {
If you want to set sidebar color to #d3ffcc , replace above code with this.

#sidebar-wrapper {
background-color:#d3ffcc;

Save the template and refresh your site.
Read More...
These navigation links are only available in the Layout Template.If you have a Classic template you have to upgrade by going to Template---->Customize Design--->Upgrade to get them.

log in to your dashboard--> layout- -> Edit HTML-->check Expand Widget Templates.Now scroll down to where you see this:-
<!-- navigation -->
<b:include name='nextprev'/>

If you want to show them only at the top you can Cut
these lines to remove to the Windows Clipboard.
or
If you want them both at the top and the bottom then do Copy.

Scroll up to find this code :

<b:includable id='main' var='top'>
<!-- posts -->
<div class='blog-posts'>

Paste the navigation code below the last line of the above code. Save Template and refresh your site.

If you want to customize them further you can change this code below as of your template :

#blog-pager-newer-link {
float: left;
}

#blog-pager-older-link {
float: right;
}

#blog-pager {
text-align: center;
}

Save Template and refresh your site.
Read More...
This tip is very usefull for every blogger.If you like this follow the steps below.

1.Log in to your dashboard--> layout- -> Edit HTML

2.Click on "Expand Widget Templates"

3.Scroll down to where you see this:-

]]></b:skin>

4.Copy below code and put it before ]]></b:skin>

.comment-body-author {
background: #E6E6E6; /* Background color*/
color: #000; /* Text color*/
border-top: 1px dotted #223344;border-bottom: 1px dotted #223344;border-left: 1px dotted #223344;border-right: 1px dotted #223344;
margin:0;
padding:0 0 0 20px; /* Posotion*/
}

5.Now Scroll down to where you see this:-

<dl id='comments-block'>
<b:loop values='data:post.comments' var='comment'>
<dt class='comment-author' expr:id='"comment-" + data:comment.id'>
<a expr:name='"comment-" + data:comment.id'/>
<b:if cond='data:comment.authorUrl'>
<a expr:href='data:comment.authorUrl' rel='nofollow'><data:comment.author/></a>
<b:else/>
<data:comment.author/>
</b:if>
said...
</dt>

<dd class='comment-body'>
<b:if cond='data:comment.isDeleted'>
<span class='deleted-comment'><data:comment.body/></span>
<b:else/>
<p><data:comment.body/></p>
</b:if>
</dd>

6.Replace above code with below code.

<dl id='comments-block'>
<b:loop values='data:post.comments' var='comment'>
<dt class='comment-author' expr:id='"comment-" + data:comment.id'>
<a expr:name='"comment-" + data:comment.id'/>
<b:if cond='data:comment.authorUrl'>
<a expr:href='data:comment.authorUrl' rel='nofollow'><data:comment.author/></a>
<b:else/>
<data:comment.author/>
</b:if>
said...
</dt>

<b:if cond='data:comment.author == data:post.author'>
<dd class='comment-body-author'>
<p><data:comment.body/></p>
</dd>
<b:else/>

<dd class='comment-body'>
<b:if cond='data:comment.isDeleted'>
<span class='deleted-comment'><data:comment.body/></span>
<b:else/>
<p><data:comment.body/></p>
</b:if>
</dd>

</b:if>

7.Click on "Save Templates" and you are done.

Note : You can change "Background color" , "Text color" and "Posotion" of above codes.
Read More...
1.Log in to your dashboard--> layout- -> Edit HTML

2.Click on "Expand Widget Templates"

3.Scroll down to where you see this:-


<p><data:post.body/></p>

Add Page Popularity Widget

Paste the below code just after <p><data:post.body/></p>.


<img expr:src='"http://foxrecord.appspot.com/rating?url=" + data:post.url + "&amp;title=" + data:post.title' />


Add Top popular pages widget

Paste the below code just after <p><data:post.body/></p>.


<script src="http://foxrecord.com/scripts/gettop.js" type="text/javascript"></script>


4.Click on "Save Templates" and you are done.

Read More...
1.First Sign up with Web2PDF.

2.Now Configure your "Save Page as PDF" button and click "Generate the JavaScript" button.

3.Then a Javascript code will be generated. Copy This code.

Now follow these simple steps :

(a)Log in to your dashboard--> layout- -> Edit HTML

(b)Click on "Expand Widget Templates"

(c)Scroll down to where you see this:

<data:post.body/>


(d)Immediately after above line, paste the code which you have generated at the Web2Pdf Online website. It's look like below code:

<!-- START: PDF Online Script -->
<script type="text/javascript">
var authorId = "XXXXXXXX-XXXX-XXXX-XXX-XXXXXXX";
var pageOrientation = "0";
var topMargin = "0.5";
var bottomMargin = "0.5";
var leftMargin = "0.5";
var rightMargin = "0.5";
</script>
<script type="text/javascript" src="http://web2.pdfonline.com/pdfonline/pdfonline.js">
</script>
<!-- END: PDF Online Script -->


(e)Click on "Save Templates" and Refresh your site.
Read More...
1.Log in to your dashboard--> layout- -> Edit HTML

2.Scroll down to where you see header-wrapper code block.It will nearly look like this:

#header-wrapper {
width:800px;
margin:0 auto 10px;
border:1px solid $bordercolor;
}


Note :- width:800px can be different value.

3.Now add "display:none;" into your header-wrapper code block.Look at below:

#header-wrapper {
width:800px;
margin:0 auto 10px;
border:1px solid $bordercolor;
display:none;
}


Done. above code hides your blog header.

4.To use a image instead header,find the below code.

<div id='header-wrapper'>
<b:section class='header' id='header' maxwidgets='1' showaddelement='no'>
<b:widget id='Header1' locked='true' title='your header title' type='Header'/>
</b:section>
</div>


5.Now paste the below code just after the above code.

<a href="URL_OF_YOUR_BLOG"><img src="URL_OF_THE_IMAGE" alt="Home" /></a>


Note : Replace URL_OF_YOUR_BLOG and URL_OF_THE_IMAGE with your content.

6.Click on "Save Templates" and you are done.
Read More...
1.Log in to your dashboard--> layout- -> Edit HTML
2.Click on "Expand Widget Templates"
3.Scroll down to where you see this:
<b:if cond='data:blog.pageType == "item"'>
<style>.fullpost{display:inline;}</style>
<p><data:post.body/></p>

<b:else/>
<style>.fullpost{display:none;}</style>
<p><data:post.body/>
<a expr:href='data:post.url'><strong>Read more...</strong></a></p>
</b:if>
4.Copy Below code.
<b:if cond='data:blog.pageType == "item"'>
<div class='similiar'>

<div class='widget-content'>
<h3>Related Posts :</h3>
<div id='data2007'/><br/><br/>
<script type='text/javascript'>

var homeUrl3 = &quot;<data:blog.homepageUrl/>&quot;;
var maxNumberOfPostsPerLabel = 4;
var maxNumberOfLabels = 10;

maxNumberOfPostsPerLabel = 100;
maxNumberOfLabels = 3;


function listEntries10(json) {
var ul = document.createElement(&#39;ul&#39;);
var maxPosts = (json.feed.entry.length &lt;= maxNumberOfPostsPerLabel) ?
json.feed.entry.length : maxNumberOfPostsPerLabel;
for (var i = 0; i &lt; maxPosts; i++) {
var entry = json.feed.entry[i];
var alturl;

for (var k = 0; k &lt; entry.link.length; k++) {
if (entry.link[k].rel == &#39;alternate&#39;) {
alturl = entry.link[k].href;
break;
}
}
var li = document.createElement(&#39;li&#39;);
var a = document.createElement(&#39;a&#39;);
a.href = alturl;

if(a.href!=location.href) {
var txt = document.createTextNode(entry.title.$t);
a.appendChild(txt);
li.appendChild(a);
ul.appendChild(li);
}
}
for (var l = 0; l &lt; json.feed.link.length; l++) {
if (json.feed.link[l].rel == &#39;alternate&#39;) {
var raw = json.feed.link[l].href;
var label = raw.substr(homeUrl3.length+13);
var k;
for (k=0; k&lt;20; k++) label = label.replace(&quot;%20&quot;, &quot; &quot;);
var txt = document.createTextNode(label);
var h = document.createElement(&#39;b&#39;);
h.appendChild(txt);
var div1 = document.createElement(&#39;div&#39;);
div1.appendChild(h);
div1.appendChild(ul);
document.getElementById(&#39;data2007&#39;).appendChild(div1);
}
}
}
function search10(query, label) {

var script = document.createElement(&#39;script&#39;);
script.setAttribute(&#39;src&#39;, query + &#39;feeds/posts/default/-/&#39;
+ label +
&#39;?alt=json-in-script&amp;callback=listEntries10&#39;);
script.setAttribute(&#39;type&#39;, &#39;text/javascript&#39;);
document.documentElement.firstChild.appendChild(script);
}

var labelArray = new Array();
var numLabel = 0;

<b:loop values='data:posts' var='post'>
<b:loop values='data:post.labels' var='label'>
textLabel = &quot;<data:label.name/>&quot;;

var test = 0;
for (var i = 0; i &lt; labelArray.length; i++)
if (labelArray[i] == textLabel) test = 1;
if (test == 0) {
labelArray.push(textLabel);
var maxLabels = (labelArray.length &lt;= maxNumberOfLabels) ?
labelArray.length : maxNumberOfLabels;
if (numLabel &lt; maxLabels) {
search10(homeUrl3, textLabel);
numLabel++;
}
}
</b:loop>
</b:loop>
</script>
</div>

</div>
</b:if>

5.Now Paste it like the example below.
<b:if cond='data:blog.pageType == "item"'>
<style>.fullpost{display:inline;}</style>
<p><data:post.body/></p>

Paste Your Code here

<b:else/>
<style>.fullpost{display:none;}</style>
<p><data:post.body/>
<a expr:href='data:post.url'><strong>Read more...</strong></a></p>
</b:if>
6.Click on "Save Templates" and refresh your site.
Read More...
1.Log in to your dashboard--> layout- -> Edit HTML
2.Click on "Expand Widget Templates"
3.Scroll down to where you see this:
<p><data:post.body/></p>

4.Replace above code with below code.
<b:if cond='data:blog.pageType == "item"'>
<style>.fullpost{display:inline;}</style>
<p><data:post.body/></p>
<b:else/>
<style>.fullpost{display:none;}</style>
<p><data:post.body/>
<a expr:href='data:post.url'><strong>Read more...</strong></a></p>
</b:if>


5.Click on "Save Templates"6.Now go to  Setting-->formatting-->Post Template.
7.Fill that "Post Template" blank text area with below code :
<span class="fullpost">


</span>
Look at the picture below.

8.Click on "Save settings"
9.When you post your article, choose "Edit Html" tab. and you will see the code below :
<span class="fullpost">


</span>
Look at this image.


10.Place the paragraps you want show with read more, above of below line.
<span class="fullpost">
11.Place the rest of the post (you want to hide) between below 2 lines.
<span class="fullpost">


</span>


Look at the image below.

12.Then Publish your post.You are done.
Note :If you want to add this feature to your old posts ,do the 9-12 steps to each posts.
Read More...
Adding  Icons on your Every Blogger Widget , you can give a good look to your blog.Follow these simple steps to do it.
1.Log in to your dashboard--> layout- -> Edit HTML
2.Click on "Expand Widget Templates"
3.Scroll down to where you see this:
.main .Blog {
border-bottom-width: 0;
}
4.After the above code , copy and paste the code below:
.sidebar .widget h2 {
background: yellow url('URL OF YOUR IMAGE') no-repeat left top;
margin-top:5px;
text-indent: 20px;
padding:7px;
}
5.Click on "Save Templates" and you are done.
Note : You must replace URL OF YOUR IMAGE with your image(Icon) URL.
You can change background colour and other values of above codes if you like.
Read More...
1.Log in to your dashboard--> layout- -> Edit HTML

2.Click on "Expand Widget Templates"
3.Scroll down to where you see this:-
<b:if cond='data:post.url'>
<a expr:href='data:post.url'><data:post.title/></a>
4.If you want to add image Before post title then add below code between above 2 lines.
<img src="Your image URL here"/>
Note : Remember to Replace "Your image URL here" with your real image URL.
After adding code, it look like below.


If you want to add image After post title then add the code like this.(after the above 2 lines)

5.Click on "Save Templates" and you are done.
Read More...
1.Log in to your dashboard--> layout- -> Edit HTML

2.Click on "Expand Widget Templates"
3.Scroll down to where you see this:-
<b:includable id='status-message'>
<b:if cond='data:navMessage'>
<div class='status-msg-wrap'>
<div class='status-msg-body'>
<data:navMessage/>
</div>
<div class='status-msg-border'>
<div class='status-msg-bg'>
<div class='status-msg-hidden'><data:navMessage/></div>
</div>
</div>
</div>
<div style='clear: both;'/>
</b:if>
</b:includable>
4.Now Replace above code with below code :
<b:includable id='status-message'>
<b:if cond='data:navMessage'>
<div>
</div>
<div style='clear: both;'/>
</b:if>
</b:includable>
5.Click on "Save Templates" and you are done.
Read More...
If you want become large first letter of your paragraph follow below steps to do it.
1.Log in to your dashboard--> layout- ->Edit HTML
2.Scroll down to where you see this :
]]></b:skin>
3.Now Add the below codes before  the above code.
.newspaper {
float:left;
color:#000;
background:#fff;
line-height:80px;
padding-:1px 5px 0 0;
font-family:times;
font-size:100px;
}
4.Now save your Template.
5.Now when you write a post ,add the below codes manually Before starting every post and Replace Frist Letter with your real post first letter.
<span class="newspaper">Frist Letter</span>


Look at the example below.
<span class="newspaper">T</span>oyota offers every type of vehicle from trucks to compact cars, giving you the option to choose the size and type of car that best fits your lifestyle. Many thing need to be considered when choosing a new car. If you have small children, safety is a large factor, as well as size depending on how many children you have. However, you may be a single mom or a bachelor simply looking for something fun and stylish. Either way, it’s important to find a car that makes you happy, and chances are high that a Pittsburgh Toyota will dealership can meet your needs.


Toyota offers every type of vehicle from trucks to compact cars, giving you the option to choose the size and type of car that best fits your lifestyle. Many thing need to be considered when choosing a new car. If you have small children, safety is a large factor, as well as size depending on how many children you have. However, you may be a single mom or a bachelor simply looking for something fun and stylish. Either way, it’s important to find a car that makes you happy, and chances are high that a Pittsburgh Toyota will dealership can meet your needs.
Read More...
Your Ad Here