Your Ad Here
Adding a Paypal donation button to your blog will give your loyal readers a chance to support(encourage) you by donating a few bucks.
If you don't have a paypal account yet,.. you can get a Free Paypal account here.

1.First,Log in to your Paypal account.


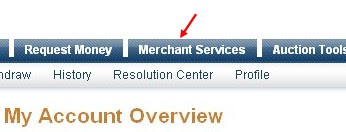
2.Click on the 'Merchant Services' tab


3.Scroll down the window and you will see an option "Donations" in the right sidebar.Click on it!

4.Now,you will see some options like Donation name/service ,donation id,etc etc...
The first field (Donation name/service) is the only thing that is required and all the remaining fields are optional.
Enter that first field,choose a button style,scroll down the window and click on "Create a button Now"

5.Now,you will see some html code... Copy it and sign in to your blogger dashboard »» Click on the layout »» Add a Page element »» html/javascript »» and paste that html code and SAVE THE CHANGES.
Read More...
You may want to create a scrolling text box with code for your viewers to copy. Here is the way to do that. Copy the code below into Edit Html part of your Post Editor :

<textarea style="WIDTH: 332px; HEIGHT: 70px" onfocus="this.select();" name="textarea" cols="14">PUT CONTENT HERE</textarea>

This will look like the following :


If you want set background :

<textarea rows="10" cols="40" style="background:#6699ff;">YOUR TEXT HERE.....</textarea>

This will look like the following :

Read More...
1.Log in to your dashboard--> layout- -> Edit HTML
2.Click on "Expand Widget Templates"
3.Scroll down to where you see this:

<p class='post-footer-line post-footer-line-1'>
<span class='post-author'>
<b:if cond='data:top.showAuthor'>
<data:top.authorLabel/> <data:post.author/>
</b:if>
</span>
4.Replace  <data:post.author/>  of above code with your new name.
5.Click on "Save Templates" and Refresh your site.
Read More...
1.Log in to your dashboard--> layout- -> Edit HTML
2.Click on "Expand Widget Templates"
3.Scroll down to where you see this:

<p class='post-footer-line post-footer-line-1'>
<span class='post-author'>
<b:if cond='data:top.showAuthor'>
<data:top.authorLabel/> <data:post.author/>
</b:if>
</span>

4.Replace <data:post.author/>  with below code.

<a href="URL OF YOUR BLOG"><img src="URL OF YOUR PICTURE" /></a>

5.Click on "Save Templates" and refresh your site.
Note : Remember to give your real information to URL OF YOUR BLOG and URL OF YOUR PICTURE.  
Read More...
If you're displaying your email address on your web site,It may be a reason to receive a ton of spam emails to your inbox.Although it's very difficult to protect yourself from receiving spam email, there is a way you can still display your email address on your web site and protect it at the same time.

Normally we use the following code to create email link with in your web page.

<A HREF="mailto:you@yourdomain.com">Contact Us</A>


Contact Me

Replace above code with below code,If you want to protect your email address from spam bots.

<A HREF="&#109;&#97;&#105;&#108;&#116;&#111;:you&#64;yourdomain.com">Contact Me</A>

Contact Me
Read More...
1.Log in to your Blogger  dashboard.

2.Click on "Settings".

3.Click on "Basic" tab.
4.Click on "Export blog".

5.Now Click "DOWNLOAD BLOG".

You are Done.
Read More...
1.Log in to your Blogger  dashboard.

2.Click on "Settings".

3.Click on "Basic" tab.
4.Click on "Delete blog"

5.Now Click on "DELETE THIS BLOG"

You are done.
Read More...
1.Log in to your Blogger  dashboard.

2.Click on "Settings".

3.Click on "Basic" tab.
4.Click on "Import blog"

5.Now Click "Browse" and choose your old blog file (.xml)  from your computor and click "Open".
6.Now type correctly the characters you see in the picture.
Note : You can your imported posts publish Automatically,checking box  "Automatically publish all imported posts"  or you can manualy publish them later.
7.Now click "IMPORT BLOG"

You are done.
Read More...
If you want to delete a comment, first make sure that you are logged in to the correct Blogger account (administrator of the blog or author of the comment). Then go to the blog and find the page where the comment is listed. Next to the comment, you should see a trash can icon, like this:


Now Click on the trash icon can and you will see this confirmation page, which also lists the comment for review:


You can click cancel, if you don't want to delete comment. Clicking the "Delete Comment" button will remove the text of the comment from your page, but leave the author's name and a message saying "this comment has been removed." If you check the "Remove Forever" option, then no trace of the comment will remain on your blog.

Read More...
There Are 5 Main Parts of a Blogger Templates.This is the basic description about these parts.
1. XML Language declarations
2. HEAD, TITLE and the META TAGS
3.Variable Definitions
4. CSS (Cascading Style Sheet) section
5.Body
Below descricptions  are Examples Of   Parts  Of the Template
XML Language declarations
<!DOCTYPE html PUBLIC "-//W3C//DTD XHTML 1.0 Strict//EN" "http://www.w3.org/TR/xhtml1/DTD/xhtml1-strict.dtd">
<html xmlns='http://www.w3.org/1999/xhtml' xmlns:b='http://www.google.com/2005/gml/b' xmlns:data='http://www.google.com/2005/gml/data' xmlns:expr='http://www.google.com/2005/gml/expr'>
<head>


HEAD, TITLE and the META TAGS
<head>
<title>Latest Tips for Bloggers|Blogger Tips And Tricks</title>
<b:include data='blog' name='all-head-content'/>
<meta content='text/html; charset=UTF-8' http-equiv='Content-Type'/>
<meta content='true' name='MSSmartTagsPreventParsing'/>
<meta content='blogger' name='generator'/>
<meta content='Latest Tips for Bloggers for easy blogging and Making Money.blogger,blogspot tips and tricks.A dummies guide,templates,layouts,widgets, JavaScript,HTML codes,SEO,Google AdSense,gadgets,How to monetize Blogger or blogspot blogs.' name='description'/>
<meta content='blogger tricks,blogspot tweaks,how to blog,blogger tips,blogging tricks,widgets,links,google,adsense,latest,Page Rank,free blog,Yahoo,MSN,FeedBurner,Comments,new bloggers,sitemaps,make money,online,Blogging tips,Sitemaps,Meta Tag,YouTube Tweaks' name='keywords'/>
<meta content='Lasantha' name='author'/>
<meta content='all,follow' name='robots'/>
<meta content='General' name='Rating'/>
<meta content='never' name='Expires'/>
<meta content='english' name='Language'/>
<meta content='Global' name='Distribution'/>
<meta content='INDEX,FOLLOW' name='Robots'/>
<meta content='4 Days' name='Revisit-after'/>
<meta content='lasanthaset4@gmail.com' name='Email'/>
<meta content='Karunarathna' name='Publisher'/>
<meta content='Keerthi' name='Copyright'/>
<META content='04a82ed1e8901452' name='y_key'></META>
<meta content='9BC9210680' name='blogcatalog'/>
<meta content='uhl6s4fkZiCGiK8tOzdJdlKTP7V4anqblyHBjk8PA0g=' name='verify-v1'/>


Variable Definitions
<b:skin><![CDATA[/*
-----------------------------------------------
Blogger Template Style
Name: Minima Ochre
Designer: Douglas Bowman
URL: www.stopdesign.com
Date: 26 Feb 2004
Updated by: Blogger Team

----------------------------------------------- */

/* Variable definitions
  ====================
  <Variable name="bgcolor" description="Page Background Color"
  type="color" default="#dd9" value="#CAF99B">
  <Variable name="textcolor" description="Text Color"
  type="color" default="#333" value="#333333">
  <Variable name="linkcolor" description="Link Color"
  type="color" default="#684" value="#0066CC">
  <Variable name="pagetitlecolor" description="Blog Title Color"
  type="color" default="#874" value="#000000">
  .............................


CSS (Cascading Style Sheet) section

/* Use this with templates/template-twocol.html */

body {
  background:$bgcolor;
  margin:0;
  color:$textcolor;
  font:x-small Georgia Serif;
  font-size/* */:/**/small;
  font-size: /**/small;
  text-align: center;
  }
a:link {
  color:$linkcolor;
  text-decoration:none;
  }
a:visited {
  color:$visitedlinkcolor;
  text-decoration:none;
  }
a:hover {
  color:$titlecolor;
  text-decoration:underline;
}
a img {
  border-width:0;
  }

/* Header
-----------------------------------------------
 */

...............

/* Footer
----------------------------------------------- */
#footer {
  width:950px;
  clear:both;
  margin:0 auto;
  padding-top:15px;
  line-height: 1.6em;
  text-transform:uppercase;
  letter-spacing:.1em;
  text-align: center;
}

/** Page structure tweaks for layout editor wireframe */
body#layout #header {
  margin-left: 0px;
  margin-right: 0px;
}
]]></b:skin>
  </head>

Body
<body>
  <div id='outer-wrapper'><div id='wrap2'>

  <!-- skip links for text browsers -->
  <span id='skiplinks' style='display:none;'>
  <a href='#main'>skip to main </a> |
  <a href='#sidebar'>skip to sidebar</a>
  </span>

  <div id='header-wrapper'>
  <b:section class='header' id='header' maxwidgets='4' showaddelement='yes'>
<b:widget id='Header1' locked='true' title='Blogger Tips And Tricks (Header)' type='Header'/>
<b:widget id='HTML17' locked='false' title='' type='HTML'/>
<b:widget id='HTML19' locked='false' title='' type='HTML'/>
</b:section>
  </div>

  <div id='content-wrapper'>

  <div class='sidebar-wrapper'>
  <b:section class='sidebar' id='sidebar1' preferred='yes'>
<b:widget id='HTML6' locked='false' title='Subscribe to Blogger Tips' type='HTML'/>
<b:widget id='LinkList2' locked='false' title='Blogger Tips - General' type='LinkList'/>
<b:widget id='HTML7' locked='false' title='' type='HTML'/>
<b:widget id='HTML1' locked='false' title='Blog Directries' type='HTML'/>
<b:widget id='HTML5' locked='false' title='Social Bookmarks' type='HTML'/>
<b:widget id='HTML11' locked='false' title='Useful Free Services' type='HTML'/>
<b:widget id='LinkList1' locked='false' title='Link' type='LinkList'/>
</b:section>
<p><a href='http://bloggertipandtrick.blogspot.com/'>Blogger Tips and Trick</a> for <a href='http://bloggertipandtrick.blogspot.com/'>Bloggers</a></p></div>

  <div id='main-wrapper'>
  <b:section class='main' id='main' showaddelement='yes'>
<b:widget id='HTML14' locked='false' title='' type='HTML'/>
<b:widget id='HTML20' locked='false' title='Search Blogger Tips And Tricks' type='HTML'/>
<b:widget id='Blog1' locked='true' title='Blog Posts' type='Blog'/>
<b:widget id='LinkList3' locked='false' title='Blogger Tips - Useful Articles' type='LinkList'/>
<b:widget id='LinkList4' locked='false' title='Blogger Tips - Change Appearance' type='LinkList'/>
<b:widget id='LinkList5' locked='false' title='Blogger Tips -Gadget,Widget,Elements,Tools' type='LinkList'/>
<b:widget id='BlogArchive1' locked='false' title='Blog Archive' type='BlogArchive'/>
<b:widget id='HTML13' locked='false' title='Privacy Policy' type='HTML'/>
</b:section>
  </div>

  <div class='sidebar-wrapper'>
  <b:section class='sidebar' id='sidebar2' preferred='yes'>
<b:widget id='HTML2' locked='false' title='Get Email Updates' type='HTML'/>
<b:widget id='Label1' locked='false' title='Labels' type='Label'/>
<b:widget id='HTML3' locked='false' title='Get Latest Updates' type='HTML'/>
<b:widget id='HTML10' locked='false' title='' type='HTML'/>
<b:widget id='Profile1' locked='false' title='About Me' type='Profile'/>
<b:widget id='HTML8' locked='false' title='Link to This Site' type='HTML'/>
<b:widget id='HTML9' locked='false' title='Support me !!!' type='HTML'/>
<b:widget id='Followers1' locked='false' title='Followers' type='Followers'/>
<b:widget id='HTML4' locked='false' title='Flag Counter' type='HTML'/>
<b:widget id='HTML15' locked='false' title='' type='HTML'/>
</b:section>
  </div>

  <!-- spacer for skins that want sidebar and main to be the same height-->
  <div class='clear'>&#160;</div>

  </div> <!-- end content-wrapper -->

  <div id='footer-wrapper'>
  <b:section class='footer' id='footer'>
<b:widget id='HTML21' locked='false' title='' type='HTML'/>
<b:widget id='HTML12' locked='false' title='Feed Directories' type='HTML'/>
</b:section>
  </div>

  </div></div> <!-- end outer-wrapper -->

<script type='text/javascript'>
var gaJsHost = ((&quot;https:&quot; == document.location.protocol) ? &quot;https://ssl.&quot; : &quot;http://www.&quot;);
document.write(unescape(&quot;%3Cscript src=&#39;&quot; + gaJsHost + &quot;google-analytics.com/ga.js&#39; type=&#39;text/javascript&#39;%3E%3C/script%3E&quot;));
</script>
<script type='text/javascript'>
try {
var pageTracker = _gat._getTracker(&quot;UA-8271964-1&quot;);
pageTracker._trackPageview();
} catch(err) {}</script>

</body>
</html> 
Read More...
1.Log in to your dashboard--> layout- -> Edit HTML

2.Scroll down to where you see <head> tag.

3.Add below code into your template just after the <head> tag.

<meta http-equiv="refresh" content="0;url=http://yournewurl.com"/>


It should Look Like This.

<head>

<meta http-equiv="refresh" content="0;url=http://yournewurl.com"/>


4.Replace http://yournewurl.com with the URL you want to redirect your old blog.

5.Click on Save Templates and you are done.

Now your blog traffic will be redirected to your new address.
Read More...
1.Login to Blogger Dashboard.

2.Click on "Settings" on your dashboard

3.Now click "Permissions" tab.

3.Under Blog Authors click on the "ADD AUTHOR" button.


4.Enter the email address of the person you wish to invite or that of your second email account and click on "Invite".


5.Go to your Gmail account and check Blogger email [invitation]. Click link and activate it, you will log in blogger.

6.Now log again with your previous(old) gmail account that you made invitation, go to Blogger Dashboard-->Settings-->permission and click give admin permission.

7.Now your blog can be managed by 2 email account, you can delete one (old) if you want.

Now you are done.
Read More...
This will help other bloggers to follow your blogspot blog easily.To add it under your blog post, follow the steps below.

1.Log in to your dashboard--> layout- -> Edit HTML

2.Click on "Expand Widget Templates"

3.Scroll down to where you see this:

Follow-This-Blog

<data:post.body/>


4.Copy below code and paste it just after the line <data:post.body/> .

<p><a href="http://www.blogger.com/follow-blog.g?blogID=YOUR-BLOG-ID" target="_blank">Follow This Blog !!!</a></p>


NOTE:Replace YOUR-BLOG-ID with your real blogger blog ID.

Your-Blog-ID

Look at the example below.

<p><a href="http://www.blogger.com/follow-blog.g?blogID=1297984091471718670" target="_blank">Follow This Blog !!!</a></p>


Your final result will look like this:

Follow This Blog !!!


5.Click on "Save Templates" and now you are done.
Read More...
When you add a blog archive to your blogger blog it shows the number of post for time periods.But if you don't like it, you can remove this post count feature from your blog archive easily.To do it,follow the steps below:

blogger blog archive

1.Log in to your dashboard--> layout- -> Edit HTML

2.Click on "Expand Widget Templates"

3.Scroll down to where you see your blog archive code:

Note : Your blog archive code will look like this:
blogger blog archive code
<b:widget id='BlogArchive1' locked='false' title='Blog Archive' type='BlogArchive'>
<b:includable id='main'>
<b:if cond='data:title'>
<h2><data:title/></h2>
</b:if>
<div class='widget-content'>
<div id='ArchiveList'>
<div expr:id='data:widget.instanceId + &quot;_ArchiveList&quot;'>
<b:if cond='data:style == &quot;HIERARCHY&quot;'>
<b:include data='data' name='interval'/>
</b:if>
<b:if cond='data:style == &quot;FLAT&quot;'>
<b:include data='data' name='flat'/>
</b:if>
<b:if cond='data:style == &quot;MENU&quot;'>
<b:include data='data' name='menu'/>
</b:if>
</div>
</div>
<b:include name='quickedit'/>
</div>
</b:includable>
<b:includable id='flat' var='data'>
<ul>
<b:loop values='data:data' var='i'>
<li class='archivedate'>
<a expr:href='data:i.url'><data:i.name/></a> (<data:i.post-count/>)
</li>
</b:loop>
</ul>
</b:includable>
<b:includable id='menu' var='data'>
<select expr:id='data:widget.instanceId + &quot;_ArchiveMenu&quot;'>
<option value=''><data:title/></option>
<b:loop values='data:data' var='i'>
<option expr:value='data:i.url'><data:i.name/> (<data:i.post-count/>)</option>
</b:loop>
</select>
</b:includable>
<b:includable id='interval' var='intervalData'>
<b:loop values='data:intervalData' var='i'>
<ul>
<li expr:class='&quot;archivedate &quot; + data:i.expclass'>
<b:include data='i' name='toggle'/>
<a class='post-count-link' expr:href='data:i.url'><data:i.name/></a>
<span class='post-count' dir='ltr'>(<data:i.post-count/>)</span>
<b:if cond='data:i.data'>
<b:include data='i.data' name='interval'/>
</b:if>
<b:if cond='data:i.posts'>
<b:include data='i.posts' name='posts'/>
</b:if>
</li>
</ul>
</b:loop>
</b:includable>
<b:includable id='toggle' var='interval'>
<b:if cond='data:interval.toggleId'>
<b:if cond='data:interval.expclass == &quot;expanded&quot;'>
<a class='toggle' href='javascript:void(0)'>
<span class='zippy toggle-open'>&#9660;&#160;</span>
</a>
<b:else/>
<a class='toggle' href='javascript:void(0)'>
<span class='zippy'>
<b:if cond='data:blog.languageDirection == &quot;rtl&quot;'>
&#9668;&#160;
<b:else/>
&#9658;&#160;
</b:if>
</span>
</a>
</b:if>
</b:if>
</b:includable>
<b:includable id='posts' var='posts'>
<ul class='posts'>
<b:loop values='data:posts' var='i'>
<li><a expr:href='data:i.url'><data:i.title/></a></li>
</b:loop>
</ul>
</b:includable>
</b:widget>


4.Now Remove below code from your blog archive code:
(<data:i.post-count/>)

Note : You can find it 3 times.

5.Now save your template and you are done.Look at the picture below:

blogger blog archive2
Read More...
This is a free Post Rating widget for your blogger blog.It is given by http://js-kit.com/.To add this beautiful Rating widget to your blogspot blog,follow the steps given below.

1.Log in to your dashboard--> layout- -> Edit HTML

2.Click on "Expand Widget Templates"

3.Scroll down to where you see this:

JS-Kit Ratings
<data:post.body/>

4.Copy one of the code below and paste it immediately after the line <data:post.body/>.

Note : This will add rating widget under your blog post.If you want to add the rating widget under post title, add below code just after <div class='post-header-line-1'/> .

Code 1:
<div style="float:left; margin-right:3px;"></div>
<div class="js-kit-rating"
expr:path="data:post.url"
expr:permalink="data:post.url"
expr:title="data:post.title">
</div>

Result:
JS-kit rating

Code 2:
<div style="float:left; margin-right:3px;"></div>
<div class="js-kit-rating"
expr:path="data:post.url"
expr:permalink="data:post.url"
expr:title="data:post.title" view="score">
</div>

Result:
JS-kit rating

5.Now again scroll down to where you see the </body> tag.

6.Add below code just before the </body> tag.

<script src="http://js-kit.com/ratings.js"></script>


7.Click on "Save Templates" and now you are done.
Read More...
This tutorial will explain step by step how to install a new blogger template to your blogger blog.

1.Log in to your Blogger Dashboard.


2.Click on "Layout".


3.Click on "Edit HTML".


4.Click on "Browse".


5.Now select your new blogger template file (it there as a xml file) and click on "Open".


6.Click on "Upload".


7.Now confirmation message will appear.Click on "KEEP WIDGETS".


You are done.
Read More...
When someone leave a comment,your site is linked automatically into his website or profile url.If you don't like this you can stop it doing this very simple trick.Simply follow the steps below to do it:

1.Login to your blogger dashboard--> layout- -> Edit HTML

2.Click on "Expand Widget Templates".

3.Scroll down to where you see below code:

<b:if cond='data:comment.authorUrl'>
<a expr:href='data:comment.authorUrl' rel='nofollow'><data:comment.author/></a>
<b:else/>
<data:comment.author/>
</b:if>


4.Now replace above code with below code:

<data:comment.author/>


5.Save your template and you are done.

Now your site will not linked to commentators sites/profiles.
Read More...
Your Ad Here